Manage Contracts
The Contracts Master in the Transportation Management System (TMS) that allows your organization to define and manage agreements with transporters. These agreements include all the essential details needed to plan and execute shipments — such as lanes (origin to destination), truck types, rate structures, transit SLAs, and commercial terms like detention charges or loading fees.
This module ensures that only valid and approved contracts are used during load planning, placement, and billing processes.
Who Uses This?
The Contracts Master is primarily used by:
- Admin: Responsible for setting up transporters, uploading contract data, and ensuring master data is consistent with ERP systems.
- Fleet Manager: Manages contract assignments to transporters, handles lane-specific contracts, and configures adhoc transporters in decentralized operations.
TransportOne provides:
- Centralized management of transporter contracts
- Support for both clustered lanes (group of routes sharing the same rates) and individual lanes
- Manual entry and bulk upload support for rates and contracts
- Version control for contracts and full audit history
- Integration support for linking contracts to ERP and load planning modules
💡 Contracts Master is a foundational setup. Without this data, transporters cannot be selected for placement or billing.
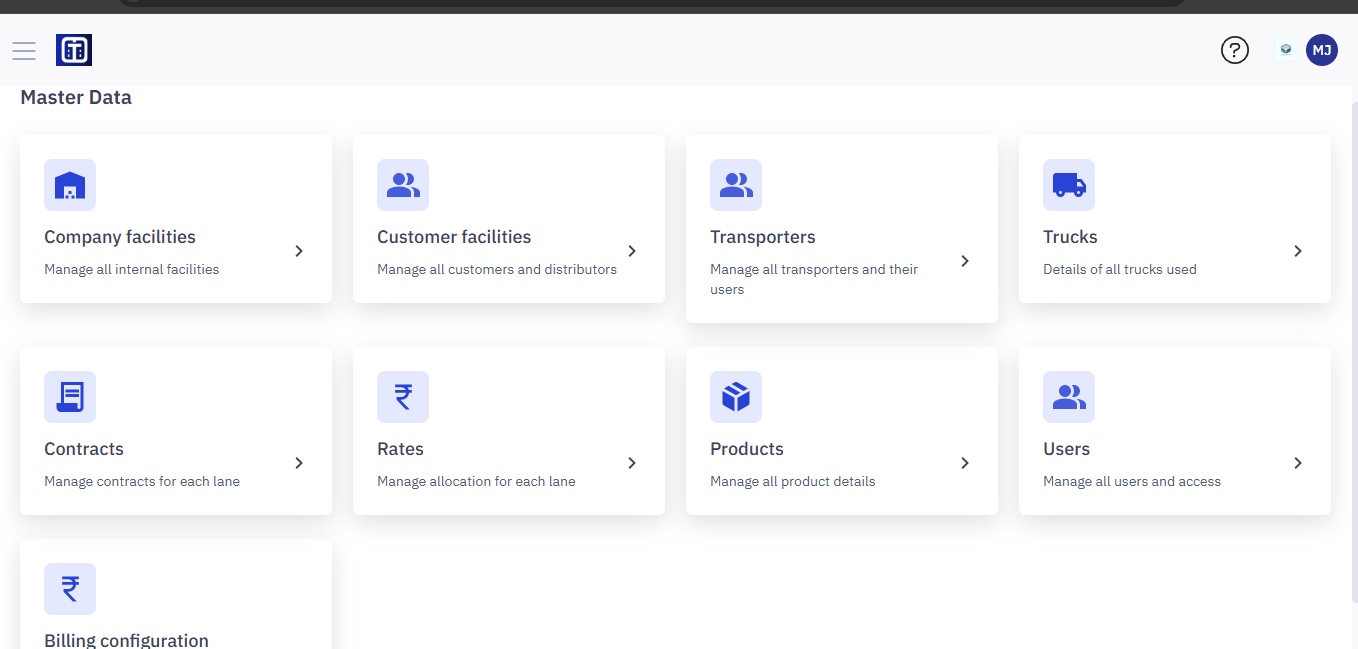
Accessing Contracts
- Navigate to the Master Data module.
- From the Master Data dashboard, click Contracts.
Note: Ensure you read the instructions before creating contracts master data, refer to the section Master Data : Key Details for All Submodules for important information about adding entries and ERP integration.
Cluster Master Setup
Before adding contracts, users must first define clusters. A Cluster is a logical grouping of origins and destinations that share the same rate or service pattern. This helps reduce redundancy in contract creation.
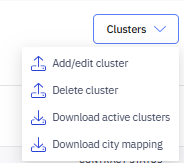
- Add/edit cluster: Opens a modal or form to create a new cluster or update an existing one.
- Delete cluster: Allows you to remove an existing cluster from the system.
- Download active clusters: Downloads a file (likely CSV or Excel) with all currently active clusters.
- Download city mapping: Downloads a city-to-cluster mapping file (probably to assist in planning or validation).
Add Cluster/ Editing Cluster
You can add a new cluster or edit an existing one to create a group of related locations (such as cities or pincodes). Clusters help simplify contract management by allowing you to assign the same transporter or rate details to multiple locations in one go.
- Click the Clusters dropdown on the top-right corner of the screen.
- Click Add/Edit cluster.
- A dialog box appears. Click Upload a file or drag & drop a
.csv,.xls, or.xlsxfile (max 5MB). - To ensure correct format, click Download Template.
- Following are the template fields:
| Field | Description |
|---|---|
Id | Optional. Leave blank for new clusters. |
Name | Name of the cluster (e.g., “East Delhi Zone”) |
State | State name |
City | City within the state |
Pin Code | Pin code being mapped to this cluster |
Client Id | Auto-mapped internally (used for system linkage) |
7. After uploading, click Process. The system will validate and save clusters.
The new cluster will now be available for contract associations.
Note: If the cluster name already exists, you can update the cities instead of creating a duplicate.
Delete a Cluster
If you no longer need a cluster, you can delete it from the system.
⚠️ Note: Deleting a cluster will remove it from all associated contracts or references. Make sure it’s not in use before deleting.
Download Active Clusters
To download list of active clusters, follow the steps below:
1. Click Clusters > Download active clusters.
2. A file (Excel or CSV) will be downloaded. This file includes:
- Cluster ID
- Cluster Name
- Associated Cities
- Status (Active/Inactive)
Download City Mapping
Get a reference file to understand which cities are mapped to which clusters.
To download city mapping, follow the steps below:
1. Click Clusters > Download city mapping.
2. A file is downloaded with:
- City Name
- Cluster Name
- Zone or Region info (if applicable)
Note: This is especially useful for planners or administrators mapping cities to zones while creating or updating contracts.
Manage Contracts
Each contract (listed under the Contracts section) may reference a cluster to define the serviceable area or pricing group.
A contract for FTL (Full Truck Load) services may be assigned to a cluster named North Zone, which includes cities like Delhi, Jaipur, and Chandigarh.
When managing or filtering contracts:
- You can use cluster-based grouping to assign service responsibilities to transporters more efficiently.
- Clusters help filter contracts by zone, city, or geography.
View the Contracts list
The Contracts page displays a list of existing contracts in a table. The table shows:
- CONTRACT ID: A unique ID for each contract.
- CONTRACT NAME: The name of the contract.
- TRUCK TYPE: The type of truck specified in the contract.
- TRANSPORTER NAME: The name of the transporter involved in the contract.
- CONTRACT END DATE: The date the contract expires.
- CONTRACT STATUS: The current status of the contract (e.g., Active, Expiring Soon, Approval Pending, Inactive, Cancelled, Draft).
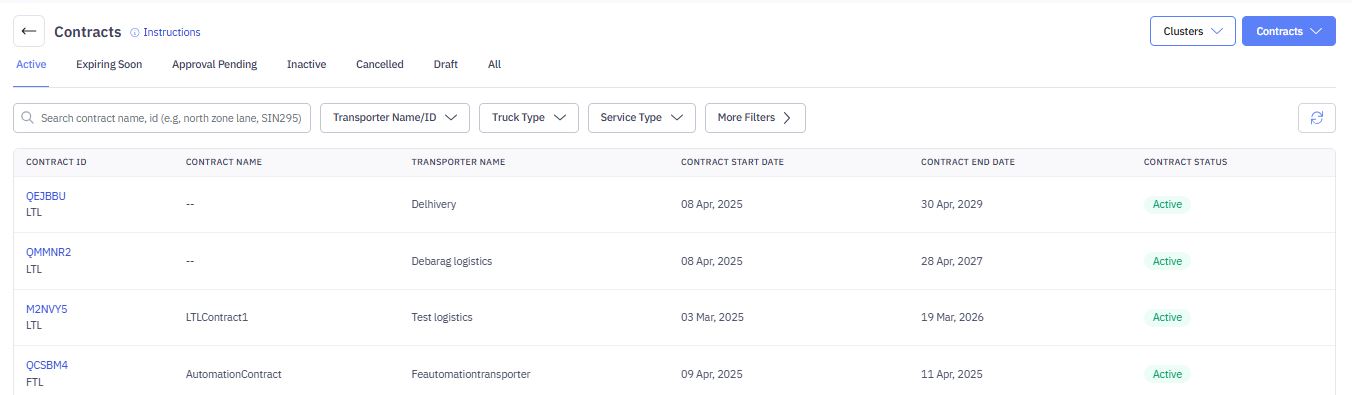
Tabs for Filtering by Contract Status:
Use the tabs (Active, Expiring Soon, Approval Pending, Inactive, Cancelled, Draft, All) to filter the list based on the contract's status. This makes it easy to find contracts that are expiring soon or that require approval.
Searching for Contracts
- In the "Search multiple Contract IDs (e.g., ABFG9W, GBYA6B)" box, enter one or more Contract IDs separated by commas.
- The list updates automatically to show matching results.

- Filtering by Transporter, Truck Type, or Rate Type:
- Click the Transporter Name/ID, Truck Type, or Rate Type dropdown.
- Select the desired criteria.
- The list filters to show matching contracts.
- Using More Filters: Click the More Filters > button to access advanced filtering options (if available)
Add a New Contract
To initiate a contract with a transporter, you must first provide transporter details and define lane-specific rates.
- Click + New Contract.
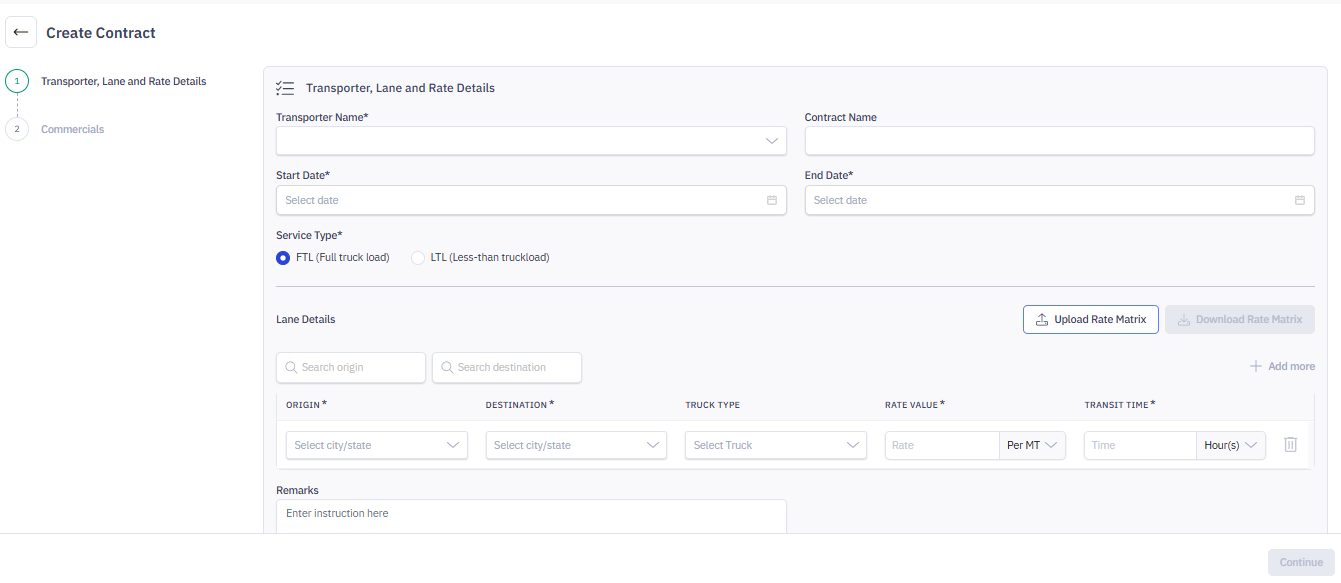
2. In Transporter, Lane, and Rate Details, define the basic details of the contract, including transporter name, contract duration, service type, and lane-wise rate configurations.
- In Transport Name, enter the transporter name.
- Contract Name, enter the contract name.
- Start Date and End Date: Enter the start and end date.
3. In Service Type, select FTL or LTL load type.
4. In Lane Details, define one or more lanes (origin-to-destination routes) along with truck types, rates, and transit time.
To configure lane details:
- Use the Search origin and Search destination fields for quick filtering.
- Complete the following fir each lane.
- Origin*: Select the city/state of origin.
- Destination*: Select the city/state of the destination.
- Truck Type: Choose the truck category for this lane.
- Rate Value*: Enter the rate and choose the unit (e.g., Per MT).
- Per MT: The rate is calculated per metric ton (MT) of cargo. For example, if the rate is ₹500 per MT and the shipment weighs 10 MT, the total charge will be ₹5000.
- Flat: A fixed rate for the entire shipment, regardless of weight or volume. Use this when the same price is charged per truck/load
- Transit Time*: Provide the estimated delivery time and select the time unit (e.g., Hour(s)).
Tip: Click the + Add more option to configure multiple lanes under the same contract.
Upload Rate Matrix
Instead of manually entering each lane, you can upload lane and rate details in bulk.
- Click Upload Rate Matrix to upload a predefined Excel file.
- Ensure the format matches the required template.
- The uploaded data will auto-populate the lane grid.
Download Rate Matrix
You can download the lane matrix template or an export of the entered lane details: The Download Rate Matrix button will be enabled once lane data is added. Use it to download the format or export data for review or reuse.
Additional Instructions
Remarks: (Optional) Enter any custom instructions or comments related to the contract.
5. Continue to Next Step
- Once all mandatory fields are completed:
- Click the Continue button at the bottom-right of the screen to move to next step.
Configure Commercial terms
After filling in the transporter, lane, and rate details, proceed to the Commercials section. This screen allows you to configure the commercial terms for the selected transporter and route. This includes charges related to loading/unloading, detention, delays, and damage coverage.
1. In Loading Charges, choose how you want to define loading charges:
- Flat amount: Specify a fixed loading fee.
- Reimbursed on actual: Charges will be reimbursed based on actual bills submitted.
2. In Unloading Charges, select how unloading charges should be handled:
- Flat amount: Enter a fixed unloading fee.
- Reimbursed on actual: Reimbursement based on actual expenses.
3. In Detention Loading Charges, click Add Slab to define charges if the vehicle is detained during loading. You can specify different slabs based on time thresholds (e.g., ₹300 after 2 hours of waiting).
4. In Detention Unloading Charges, click Add Slab to define charges for delays during unloading. Configure based on waiting time beyond the allowed free time.
5. In Multi-Point Charges, select how charges apply for trips with multiple stops:
- Per KM: Enter rate for additional kilometers.
- Per Point: Enter rate per extra delivery/pickup point.
6. In Delay Penalty, click Add Slab to define penalties for delayed delivery. You can set different slabs based on how late the vehicle is.
7. In Max Damage Amount, enter the maximum amount (in INR) the transporter will be liable for in case of goods damage during transit.
💡 Note: You can always go back to update or add more slabs as needed.
- Click Save.
- Upload Multiple Contracts:
- Click Contracts Upload.
- Select a CSV or Excel file containing your contract data. (See your TMS documentation for the required file format.) Ensure the Reference IDs match your ERP system.
- Review the data and confirm the upload.
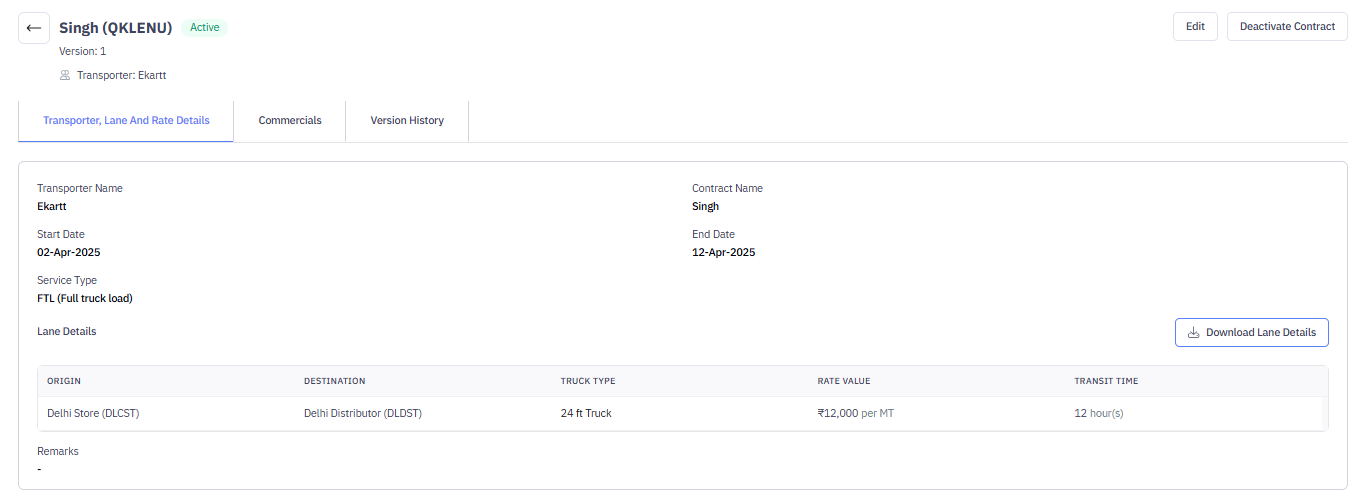
View and Edit Contract Details
Click a row in the list to view or edit a contract's details. You can update any of the information associated with the contract. Click Save to save your changes.
To make changes to an existing transporter contract:
1. Navigate to the Contract. Go to the relevant contract from the list. You’ll see the contract summary with tabs like:
- Transporter, Lane and Rate Details
- Commercials
- Version History
2. Click Edit. In the top-right corner.
3. In Update Details. You can now modify:
- Transporter name, contract name, dates, and service type
- Lane details such as origin, destination, truck type, rate value (per MT or flat), and transit time
- Commercials including loading/unloading charges, detention slabs, multi-point charges, penalties, and max damage amount
4. Save Changes. After making the required updates, click Submit to save the changes.