
RFQ (Request for Quote)
The Request for Quotation (RFQ) feature in TransportOne helps you manage freight procurement in a faster, more organized way. Instead of reaching out to transporters over email or calls, you can use this feature to share transport requirements, collect quotes, and finalize contracts—all within the system.
Use this when you want to plan for future shipments, compare transporter quotes, and negotiate for better rates before awarding business.
What You Can Do with This Feature
- Define your transport requirements across lanes and vehicle types
- Invite transporters to submit bids
- Compare prices and performance side by side
- Send counteroffers directly from the system
- Finalize and allocate based on your business needs
Create and manage an RFQ
Step 1: Go to the RFQ Section
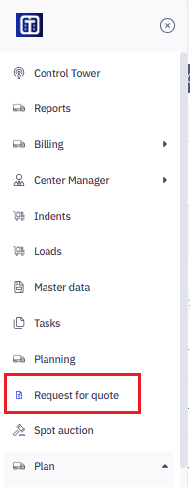
- From the TransportOne UI, go to the Request for Quote menu in the left panel.
- You’ll land on the RFQ listing screen where all your existing RFQs are shown.
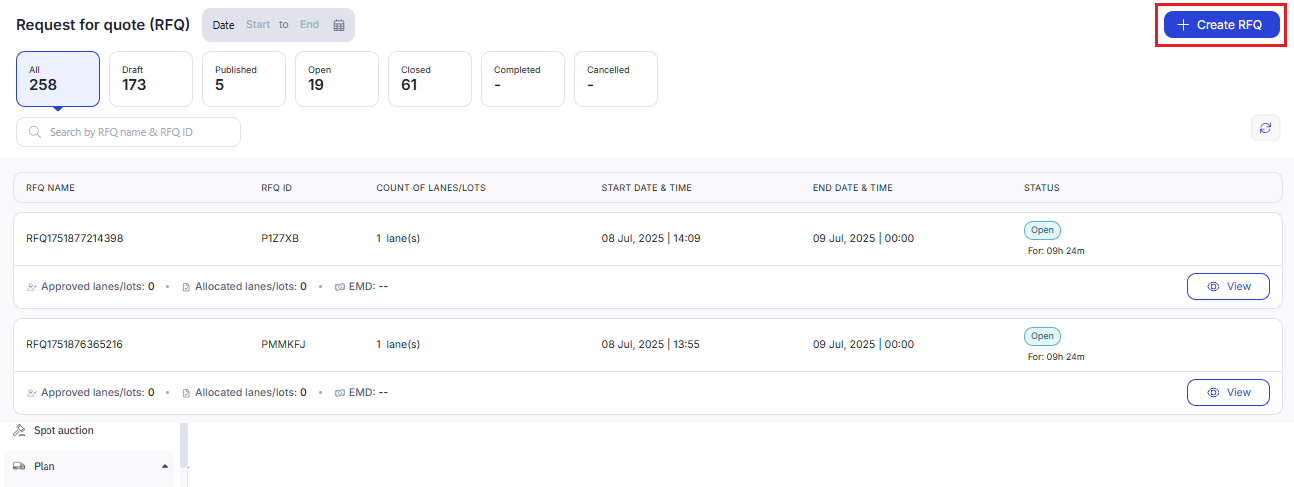
Step 2: Create RFQ
In this step, you set the basics for your quote request—when bidding opens and closes, how low prices can drop, how long the agreed rate should last, and when you need trucks to start moving.
On the Create RFQ screen, start by completing the Basic details section:
- RFQ name:
Enter a name for the RFQ. This can be auto-generated (e.g.,RFQ1751965571669) or renamed to reflect the purpose or region—such as North Region – Q3 Primary Movement. - Start date & time:
Select when the bidding should begin. Transporters will be allowed to place bids only after this time. - End date & time:
Set the deadline by which transporters must submit their bids. No bids will be accepted after this time. - Bid decrement:
This is the minimum amount a transporter must lower their bid by if they want to revise it.
For example, if you set this to ₹100, a transporter who quoted ₹5,000 must quote ₹4,900 or less in their next bid. - Contract period:
Select how long the transporter engagement will last (e.g., 3 months, 6 months, 1 year). This is the duration for which the transporter will be expected to operate under the agreed rate. - Contract start date:
The date the winning transporter must put trucks on the road. Choose the date when the awarded transporter is expected to begin service.
Once you've filled in all the required fields, click Next to move and enter your route and vehicle details.
Step 3: Choose how you want to add routes
In this step, you decide whether to add routes one by one (Lane) or group them together (Lot) before moving forward.
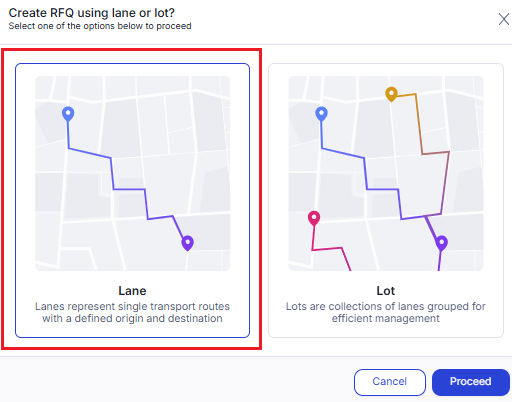
After entering the basic RFQ details, you'll be asked how you want to set up your transport requirements:
Option 1: Lane
- Use this if you want to add routes individually—one origin to one destination. Best for when each route needs its own price and planning.
- Example: Delhi → Mumbai & Chennai → Bengaluru
- When you use Lane, the bid decrement will be in rupees (₹). This means transporters must lower their bid by at least the set amount (like ₹100) to submit a revised offer.
Option 2: Lot
- Use this if you want to group several lanes together and collect one combined quote. Best for when you're moving similar goods across multiple routes and want to manage them together.
- Example: Club all north India routes into one lot and get a single bid from transporters.
- This is useful when:
- The routes are similar or run under a common contract
- You want to negotiate at a broader level
For Lot, the bid decrement will be in percentage (%), since the value can be higher across grouped routes.
Note: You can select only one option—either Lane or Lot—in a single RFQ. You cannot use both together.
Currently, only Lane-based RFQs are supported. Lot-based RFQs will be available soon.
2. Click Proceed to continue.
Step 4: Add your requirement to transporters
In this step, you’ll enter the actual routes for which you want to collect quotes from transporters.
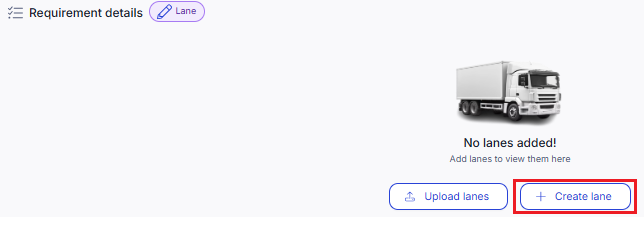
On the Requirement details screen, you'll see that no lanes have been added yet. You have two options:
Option 1: Create lane
- Click this if you want to manually add one route at a time.
- You’ll be asked to fill in basic information like:
- Origin and destination (city or facility)
- Vehicle type
- Vehicle type
- Load quantity or expected trips
- Expected rate (optional)
Option 2: Upload lanes
- Use this if you already have a list of lanes in a file (typically Excel). The system will upload all of them at once, saving you time.
Tip: Start with Create lane if you only have a few routes. Use Upload lanes if you're setting up multiple routes at once.
2. Click Create lane or Upload lanes to proceed.
Note: It’s usually recommended to upload lanes using a file—especially if you have multiple routes—as this saves time and avoids the need to create each lane one by one.
In the next steps, we’ll show you how to manually create a single lane. If you prefer to upload, you can simply click Upload lanes and submit your file to continue.
Step 4: Create a lane
In this step, you’ll enter the route, vehicle type, quantity, and how you want to split the work between transporters.
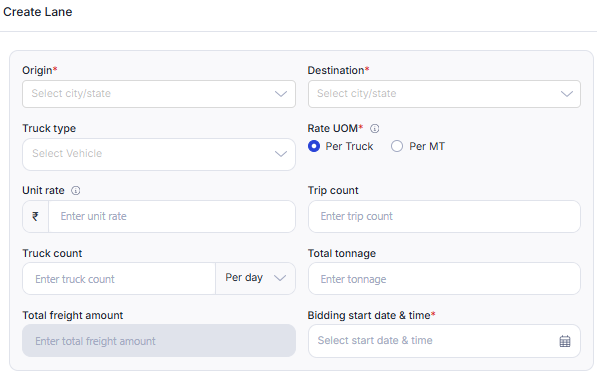
1. On the Create Lane screen, fill in the following fields:
- Origin and Destination: Select the city or state where the shipment starts and ends.
- Truck type: Choose the type of vehicle required for this lane.
- Rate UOM (Unit of Measure): Select how you want transporters to quote:
- Per Truck – fixed rate per vehicle
- Per MT – rate based on weight of goods (per metric ton)
- Unit rate (optional): Enter the rate you're expecting per truck or per MT.
- Trip count: Mention the total number of trips you expect during the contract.
- Truck count: Enter the number of trucks you need per day.
- Total tonnage: Add the overall expected load in metric tons for the contract duration.
- Total freight amount: This auto-calculates based on unit rate and volume details.
- Bidding start date & time: Set when you want transporters to start bidding for this lane.
2. Contract SOW (Share of Wallet)
At the bottom of the screen, you can divide the contract volume among multiple transporters:
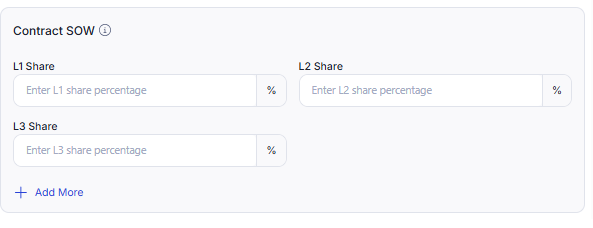
- L1 Share – Share for the lowest bid
- L2 Share – Share for second-best bid
- L3 Share – And so on
3. Use Add More to add more levels if needed.
Example: If you want to give 70% of trips to L1, 20% to L2, and 10% to L3, enter those percentages here.
Make sure the total always adds up to 100%.
4. Once done, click Proceed to save the lane and return to the RFQ setup.
Step 5: View and manage added lane
In this step, you can view the lane you’ve added, make edits, search or filter lanes, and switch between lane and lot if needed. You can refer to the screenshot below to see what can be edited. Each action is marked with a number to help you identify it easily.
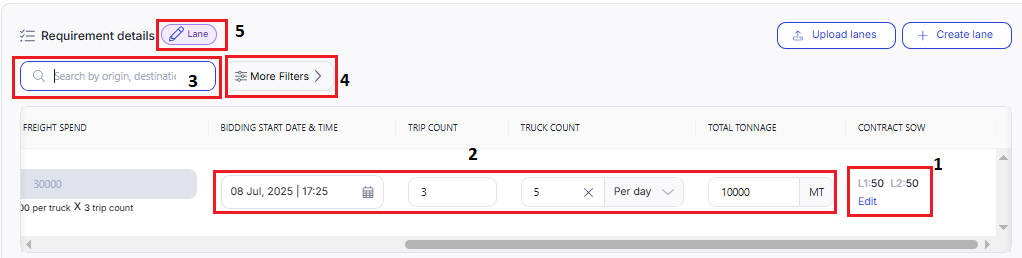
1. Once a lane is created, it appears in the table view below. From here, you can do the following:
- Edit Contract Share (SOW
Click Edit in the SOW column to update how you want to split the work between transporters (e.g., L1: 70%, L2: 30%). - Edit specific values
You can directly update details like: Bidding start time, Trip count, Truck count, Tonnage, Contract SOW (e.g., L1:50, L2:50) using the Edit link. - Search bar
Use the search box to quickly locate a lane using keywords like origin, destination, or vehicle type. - More filters
Click More filters to narrow down your lanes using: Truck type & Rate UOM (e.g., per truck or per MT) - Switch between Lane and Lot
You can still change the RFQ type (Lane or Lot) using the dropdown above the lane table.
Note: Changing between Lane and Lot at this stage may cause data loss for already entered lanes. Confirm before switching.
Tip: Make sure you’re done reviewing or editing lanes before proceeding to invite transporters.
2. Click Continue to add the requirements. Move to the next tab to invite transporters to participate in bid.
Step 6: Invite Transporters
In this step, you’ll select which transporters should receive your RFQ and be allowed to submit bids.

1. You’ll see a list of all available transporters in your network.
On this screen, you can do the following:
- Search for transporters by name, code, or location using the search bar.
- Select transporters one by one using the checkboxes, or click Select all to invite all on the list.
- Review transporter info like company name, location, and unique code.
- Create a new transporter if someone is missing by clicking the Create New Transporter link.
Info:
- Use the pagination bar at the bottom to navigate through all available transporters.
- You can see how many transporters you’ve selected in the summary on the top right.
- You can invite as many as needed based on who you want to participate in bidding.
2. Once you’ve finished selecting, click Continue to proceed.
Step 7: Upload Terms and Conditions
In this step, you’ll upload the terms and conditions that transporters must agree to before participating in the bidding process.
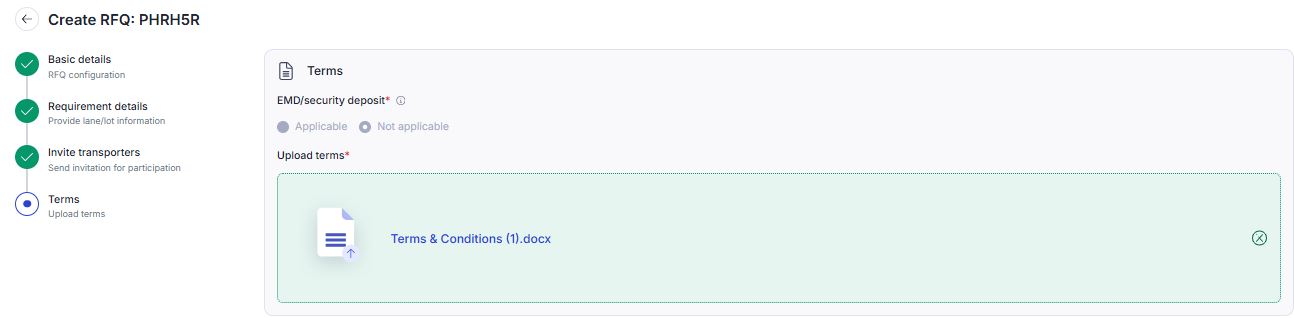
1. On this screen, you can do the following:
- Select if EMD (security deposit) is applicable
- Choose Applicable if you require transporters to submit an Earnest Money Deposit (EMD) for this RFQ.
- Select Not applicable if EMD is not needed.
2. Upload the terms document
Click Upload terms and select your file (typically a .docx or PDF file that includes all commercial, operational, and payment terms).
The uploaded document will be visible for transporter reference once the RFQ is published.
Make sure the document clearly states expectations, service levels, payment terms, penalties (if any), and any conditions tied to EMD.
3. Once done, review the uploaded file and click Publish to complete RFQ creation. On the next screen, give your confirmation and click Yes.
Info: What happens next?
- Transporters you invited will receive an email notification.
- The email will include a direct link to the RFQ, which opens in their transporter portal.
- They can view the full RFQ details and submit or revise their bids within the bidding window.
Tip: You don’t need to follow up manually. The system handles notifications and access for transporters automatically.
During the bidding window, transporters can:
- Submit their quote
- Revise their bid, if needed, before the deadline
4. After you publish the RFQ, you’ll need to go back to the RFQ listing screen to view the RFQ you just created. From there, you can open the RFQ to review details, track bids, or take further action.
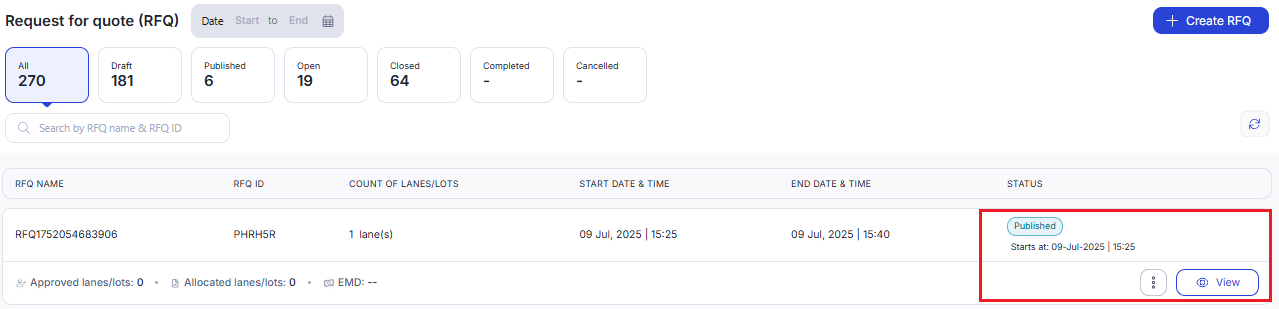
Step 8: Click Allocate from the RFQ listing screen
In this step, you’ll review submitted bids and select which transporter(s) you want to award the RFQ to.
Once the bidding window ends and at least one transporter has submitted a bid, you’ll see an Allocate button appear next to the RFQ on the listing screen.
1. Click Allocate to move to the bid review screen.
Or, next to the Allocate button, you can also:
- View: Open the RFQ without taking action
- Re-open: Reopen bidding if you didn’t receive enough quotes
- Mark completed: Close the RFQ without awarding

Step 9: Review bids and finalize allocation
In this step, you’ll evaluate bids, assign share (if applicable), and approve or reject the outcome.
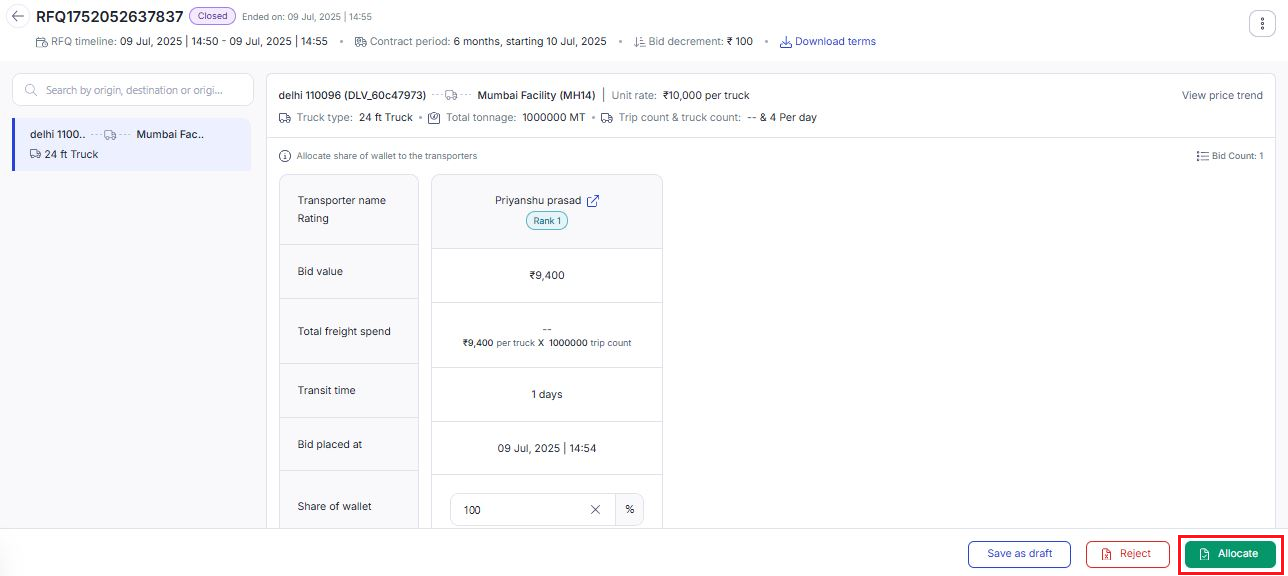
1. After clicking Allocate, you’ll be taken to the bid review screen.
2. On this screen, you can do the following:
- Compare submitted bids: View the bid value, freight spend, transit time, and rank for each transporter.
- Allocate share (optional): If multiple transporters have placed competitive bids, you can split the work using Share of Wallet (%).
- Example: Assign 70% to L1 and 30% to L2
- If only one bid is received, 100% is auto-filled
3. Choose an action

- Approve: Approve and notify the selected transporter(s)
- Reject: Reject all bids (for example, if the rates are too high or don’t meet your expectations)
- Save as draft: Use this if you're still reviewing or waiting for approvals internally
Once approved, transporters receive a confirmation email and can view details in their Transporter portal.